Setting up Jekyll on Windows is not as easy as installing on Linux or macOS. Several errors may occur if you do not correctly setup dependencies for Jekyll on Windows.
Setting up Jekyll via RubyInstaller on Windows
Learn how to run Jekyll, the blog-aware, static site generator in via RubyInstaller on Windows.
- Jekyll official documentation
- How to run Jekyll v2.x on Windows, by Julian Thilo
- How to install Jekyll v3.x on Windows, by Sverrir Sigmundarson
Some common issues of Jekyll while running on Windows
Here are some common errors or warnings which may occur while setting up Jekyll on windows:
GitHub Metadata: No GitHub API authentication could be found. Some fields may be missing or have incorrect data.
Error: SSL_connect returned=1 errno=0 state=SSLv3 read server certificate B: certificate verify failed
Error: Run jekyll build –trace for more information.
Fixing Jekyll OpenSSL default certificate error on Windows
Liquid Exception: SSL_connect returned=1 errno=0 state=SSLv3 read server certificate B: certificate verify failed
Do the following steps to fix this error on your local environment (please do not follow these steps in a production server!):
- Download the cacert.pem file and save this on your hard drive (recommended path
C:\RubyInstaller\cacert.pem). - Now goto Control Panel > System > Advances system settings and click Environment Variables. Or simply type “environment variables” on Start menu search box.
- Then define new user variable with variable name
SSL_CERT_FILEand variable valueC:\RubyInstaller\cacert.pem. - Now click OK and Apply.
- System reboot may needed to work for first time.
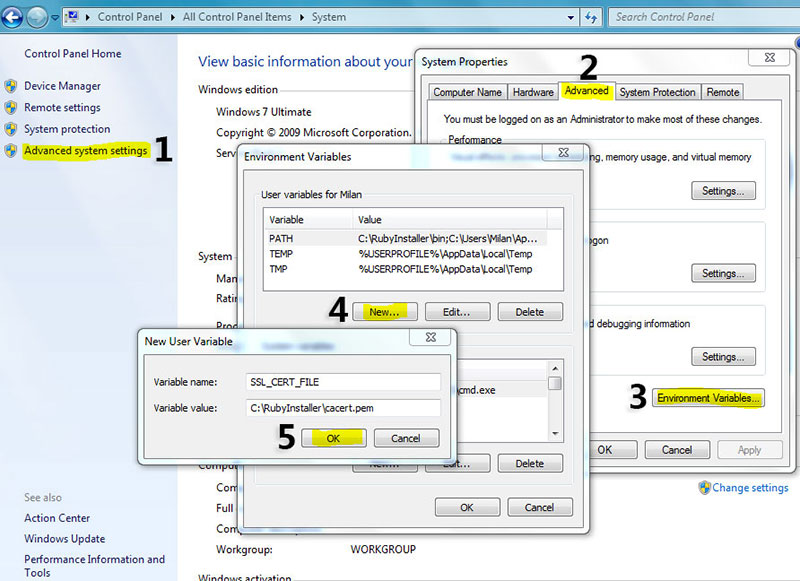 Setting environment variables on Windows
Fixing Jekyll GitHub Metadata warning on Windows
GitHub Metadata: No GitHub API authentication could be found. Some fields may be missing or have incorrect data.
If you have recently upgraded to Jekyll v3.x.x then you may face GitHub Metadata warning (in your local development environment) if you have have use any github-metadata, a.k.a. site.github Liquid tag in your Jekyll site.
Here’s the solution to fix this warning and access GitHub Metadata on your Windows local development environment:
- Create an GitHub access token with
public_reposcope. (Remember to keep your tokens secret; treat them just like passwords!) - Now similarly as previous goto Control Panel > System > Advances system settings and click Environment Variables. Or simply type “environment variables” on Start menu search box.
- Then define new user variable with variable name
JEKYLL_GITHUB_TOKENand GitHub access token as variable value (which is something likeabc123def456). - Now click OK and Apply.
- System reboot may needed to work for first time.
For security reason you can also access GitHub token with the following command line while building or serving Jekyll site:
JEKYLL_GITHUB_TOKEN=abc123def456 bundle exec jekyll serve
Setting up Jekyll via Bash on Windows 10 (WSL: Ubuntu)
If you are using Windows 10 version 1607 or later, you can run Jekyll by installing the Windows Subsystem for Linux (WSL).
1. Install WSL
Before installing Ubuntu distro enable WSL feature with the Powershell:
Enable-WindowsOptionalFeature -Online -FeatureName Microsoft-Windows-Subsystem-Linux
And, get Ubuntu distro from
- Microsoft Store
or with - command-line/script on Powershell
2. Prepare OS
Update OS packages:
sudo apt update -y && sudo apt upgrade -y
3. Setup Ruby and gems
Install zlib for Nokogiri (鋸) Ruby gem:
sudo apt install zlib1g zlib1g-dev
Install Ruby with WSL Ubuntu OS native apt:
sudo apt -y update

sudo apt install ruby-full build-essential zlib1g-dev

ruby --version
And, avoid installing Ruby Gems as the root user
echo '# Install Ruby Gems to ~/gems' >> ~/.bashrc
echo 'export GEM_HOME="$HOME/gems"' >> ~/.bashrc
echo 'export PATH="$HOME/gems/bin:$PATH"' >> ~/.bashrc
source ~/.bashrc
Install essential gems for your project
Install Bundler gem:
gem install bundler
Following is the example contents of Gemfile for Jekyll project:
# frozen_string_literal: true

source 'https://rubygems.org'

gem 'jekyll', '~> 4.2'

group :jekyll_plugins do
  gem 'jekyll-seo-tag', '~> 2.7', '>= 2.7.1'
  gem 'jekyll-sitemap', '~> 1.4'
end
Place the Gemfile in the project root folder and install required gems with the following command line:
bundle install
That’s it! You’re ready to start using Jekyll.